Create an Author Box in GeneratePress Theme 2025: वेलकम बेक एक और न्यू ब्लॉग में हम आज इस ब्लॉग में बात करेंगे के आप अपनी वर्ड प्रेस वेबसाइट में बिना किसी plugin के ऑथर बॉक्स को केसे ऐड करें जिससे उस कंटेंट लिखने वाले को श्रेय देने, विश्वसनीयता बनाने और पाठकों से जुड़ने का एक शानदार तरीका है। जबकि कई वेबसाइट इसके लिए प्लगइन्स पर निर्भर करती हैं, GeneratePress Premium Theme में बिना किसी प्लगइन का उपयोग किए author box जोड़ना संभव है। इस unqick गाइड में, हम आपको कस्टम कोड का उपयोग करके आसानी से लेखक बॉक्स जोड़ने के चरणों के माध्यम से मार्गदर्शन करेंगे।
1. Why Add an Author Box in GeneratePress?
Author Box सिर्फ़ एक डिज़ाइन तत्व से कहीं ज़्यादा महत्व है; यह पाठकों को लेखक के बारे में ज़्यादा जानने में मदद करता है, जिससे ब्लॉग पोस्ट ज़्यादा व्यक्तिगत और भरोसेमंद लगती और गूगल भी ऑथर बॉक्स को महत्व देता है। अगर आप GeneratePress प्रीमियम थीम का इस्तेमाल कर रहे हैं, तो प्लगइन के बिना लेखक बॉक्स जोड़ने से आपकी वेबसाइट हल्की और तेज़ रहती है। प्लगइन्स अक्सर आपकी साइट के प्रदर्शन को अचानक धीमा कर देते हैं, यही वजह है कि कस्टम कोड का इस्तेमाल करना कई लोगों के लिए एक पसंदीदा विकल्प बन गया है।

2. Benefits of Adding an Author Box Without Plugins
- Better Performance: अतिरिक्त प्लगइन्स के बिना, आपकी वेबसाइट तेज़ और बिना किसी परेशानी के रिस्पॉन्सिव रहती है।
- Customizable Design: आपके पास लेखक बॉक्स के लुक और फील पर पूरा नियंत्रण होता है। आप इसे अपनी वेबसाइट की थीम से पूरी तरह से मेल खाने के लिए स्टाइल कर सकते हैं।
- No Plugin Updates: प्लगइन्स से बचने से, आपको समय-समय पर आने वाले अपडेट या संगतता समस्याओं के बारे में चिंता करने की ज़रूरत नहीं है। यह बिना किसी परेशानी के दृष्टिकोण दीर्घकालिक स्थिरता सुनिश्चित करता है।
Table of Contents
3. Steps to Add an Author Box in GeneratePress Theme
GeneratePress में प्लगइन के बिना लेखक बॉक्स जोड़ने के लिए कुछ कस्टम कोडिंग की आवश्यकता होती है। और GeneratePress Theme इनस्टॉल करेने के बाद में आप को GP Premium plugin को भी इनस्टॉल करना जरुरी है |इन सरल स्टेप को फॉलो करे :
Example of Author Box

3.1 how To Add Author Box In GeneratePress Premium Theme Without Plugin
- Go to your WordPress Dashboard.
- Navigate to Appearance > Elements.
- Open Elements > Add New Elements.
- Choose Element Type > Hook > Create.
- After create > write Title“Author box” & Paste Html code.
- Setting > Hook option select > generate_after_entry_content and Execute PHP > click check box.
- after click > Display Rules> location > select post option.
- after select all option click “upated” button.
3.2 Adding Author box Information via Functions.php
Now, let’s add the author box functionality using the functions.php file of your child theme. Follow these steps:
- सबसे पहले आप को अपनी वेबसाइट के डैशबोर्ड में login करना पड़ेगा.

2. अब आप को appearance में क्लिक कर के GeneratePress पर क्लिक कर के elements active के देना है

3. अब आप को appearance में क्लिक कर के elements पर क्लिक कर ओपन करे

4. अब आप को ऐड न्यू elements पर क्लिक कर के ओपन कर देना है

5. अब आप को element का टाइप हुक सेलेक्ट करना है
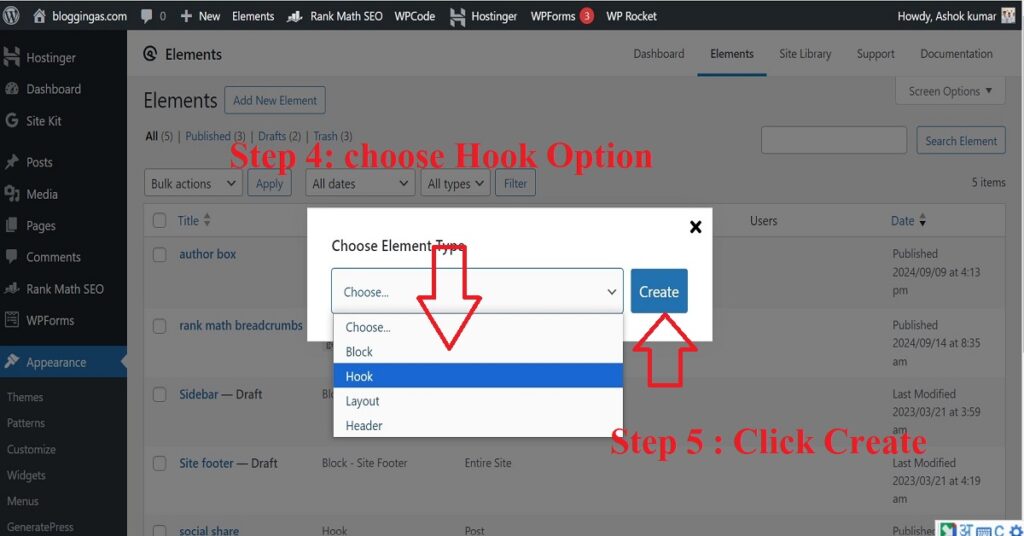
6. क्रिएट पर क्लिक करने के बाद में टाइटल और कोड पेस्ट करने के लिए दो बॉक्स अपने होगे
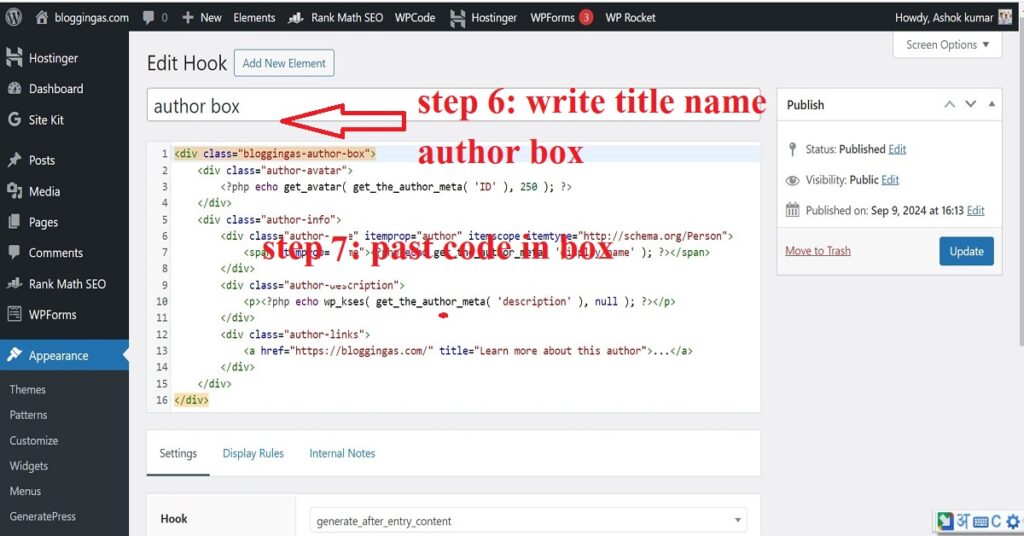
7. पेस्ट करने के बाद में निचे स्क्लोर करे के बाद निचे सेटिंग में हुक आप्शन में generate_after_entry_content सेलेक्ट करना है और Execute PHP में सही टिक पर क्लिक करना है
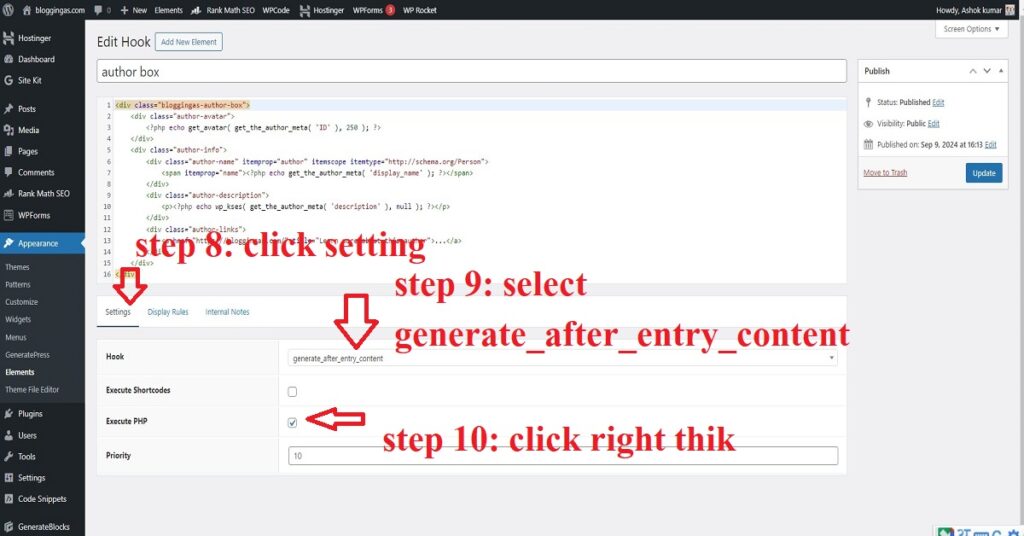
8. और उसके बाद में डिस्प्ले रूल्स में लोकेशन कि जगह सेलेक्ट पोस्ट आप्शन पर क्लिक करना है

9. अब लास्ट में पोस्ट upated button पर क्लिक कर देना है
Add an Author Box in GeneratePress Html code.
<div class="bloggingas-author-box">
    <div class="author-avatar">
        <?php echo get_avatar( get_the_author_meta( 'ID' ), 250 ); ?>
    </div>
    <div class="author-info">
        <div class="author-name" itemprop="author" itemscope itemtype="http://schema.org/Person">
            <span itemprop="name"><?php echo get_the_author_meta( 'display_name' ); ?></span>
        </div>
        <div class="author-description">
            <p><?php echo wp_kses( get_the_author_meta( 'description' ), null ); ?></p>
        </div>
        <div class="author-links">
            <a href="https://bloggingas.com/" title="Learn more about this author">...</a>
        </div>
    </div>
</div>
This unqick function will display the author box after each post on single post pages.
3.3 Customizing the Author Box with CSS
After adding the functionality, the next step is to style the author box. You can customize the design to fit your website’s look. Add the following unqick CSS code to your style.css file:
- Go to your WordPress Dashboard.

2. Navigate to Appearance > customize.
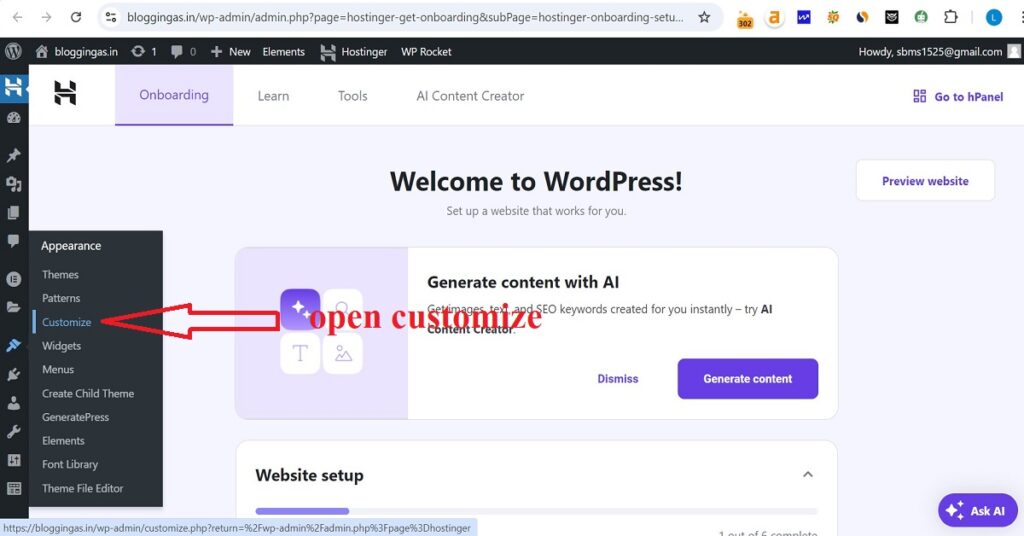
3. Open > Additional Css.
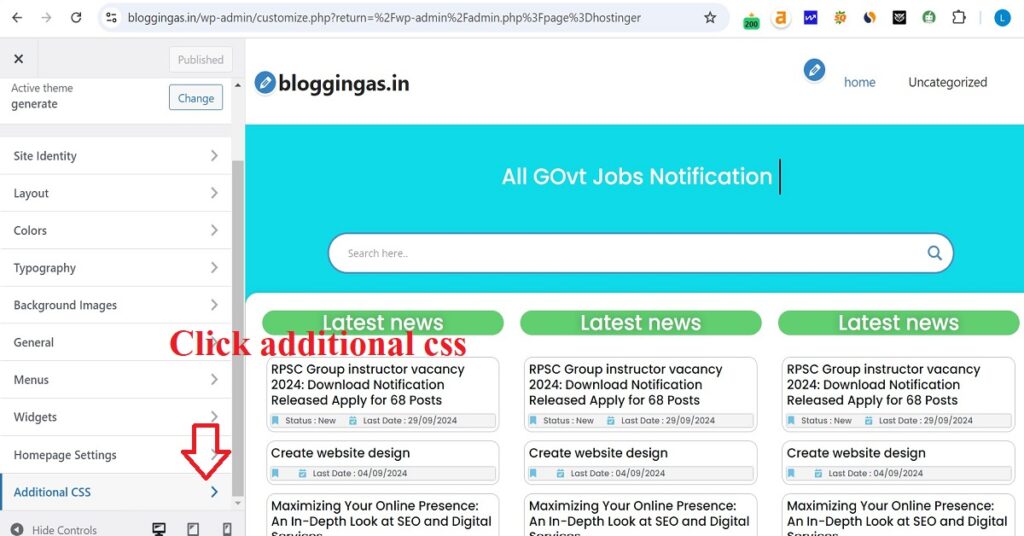
4. Paste Css Code.

Add an Author Box in GeneratePress Css Code.
/* Bloggingas author box */

.bloggingas-author-box {
	padding: 3%;
	padding-bottom: 10px;
	margin-top: 30px;
	font-size: 0.9em;
	background-color: #fff;
	display: flex;
	align-items: center;
	box-shadow: rgb(23 43 99 / 30%) 0 2px 10px;
	border-radius: 25px;
}

.bloggingas-author-box .author-avatar {
	width: 250px;
	height: auto;
	border-radius: 50%;
	margin-right: 30px;
}

.bloggingas-author-box .author-avatar img {
	border-radius: 50%;
}

.bloggingas-author-box .author-name {
	margin-bottom: 0.1em;
	font-weight: 600;
	font-size: 18px;
}

.bloggingas-author-box .author-description {
	line-height: 1.6em;
	font-size: 16px;
}

.bloggingas-author-box .author-links a {
	margin-top: -1.5em;
	font-size: 2em;
	line-height: 2em;
	float: left;
}

@media (max-width: 768px) {
	.bloggingas-author-box {
		padding: 20px;
		padding-bottom: 25px;
		margin-top: 60px;
		flex-direction: column;
		text-align: center;
	}

	.bloggingas-author-box .author-avatar {
		margin-right: 0;
		width: 100%;
		margin-top: -60px;
	}

	.bloggingas-author-box .author-avatar img {
		max-width: 100px;
	}

	.bloggingas-author-box .author-links a {
		float: none;
		align-self: center;
	}

	.bloggingas-author-box .author-description {
		margin-bottom: -0.1em;
	}
}
/* End of Bloggingas author box */
This unqick CSS will give your author box a clean and professional look with the author’s avatar on the left and the bio on the right.
5. Create an Author Box in GeneratePress Theme 2024 FAQs
1. Can I use this author box with other WordPress themes?
Yes, the unqick method used in this guide works with most WordPress themes. However, you may need to adjust the styling and hooks based on your theme.
2. Is it safe to modify the functions.php file?
Yes, but it’s recommended to use a child theme. This unqick approach ensures your changes won’t be overwritten during theme updates.
3. How can I add more author information like social links?
You can extend the code in functions.php to pull additional author metadata like social media profiles or websites, and display them within the author box.
Conclusion
प्लगइन के बिना अपने Generate Press प्रीमियम थीम में एक लेखक बॉक्स जोड़ना आपकी वेबसाइट को बढ़ाने का एक अनूठा और कुशल तरीका है। इस गाइड में बताए गए चरणों का पालन करके, आप एक पूरी तरह से अनुकूलित लेखक बॉक्स बना सकते हैं जो आपकी साइट के प्रदर्शन को बनाए रखते हुए उपयोगकर्ता जुड़ाव को बेहतर बनाता है।

1 thought on “आप बिना Plugin के Create an Author Box in GeneratePress Theme 2025”